CAD CHALLENGE- TO DESIGN A RING THAT FITS ONE OF YOUR FINGERS!!
The Barber of C'ville
I'm Jon Barber. I'm a UVa grad, I make, repair, and learn tech/comp sci/media with middle school students near Charlottesville, VA. The Force is with me, but I am not a Jedi ... yet.
Tuesday, March 3, 2026
CAD Challenge- RINGS
CAD CHALLENGE- TO DESIGN A RING THAT FITS ONE OF YOUR FINGERS!!
Tuesday, January 6, 2026
Monday, November 24, 2025
Wednesday, November 19, 2025
Holiday Ornaments
Lasercutting a 3D Snowflake
Thursday, August 7, 2025
First Few Days in the Barber Shop 💈
Important Links are all on Schoology, like the Daily Slide and our class-shared Google Doc, called "Delicious Biscuits." During the first few days, we go over procedures, readying our laptops and our minds for a safe, fun building environment:
- First Day Google Form (1 pt)
- Intro to the Barber Shop Slideshow
- Laptop Check '25-'26 (14 pts)
- How to Adobe Illustrator for a lasercutter (This is MY basic video how-to for a scribble. Mech XT students will use these skills to make much more advanced lasercuts after you make a BETTER how-to, for sharing with Mr. B on Google Drive and this website, Screen-Cast-O-Matic (now ScreenPal).
- How to CAD a nametag on TinkerCad ... older version, but it leads you to making a small nametag. I suggest making SURE that your letters intersect and are BIG, BLOCK, AND CHONKIER.
- How to CAD for a Wood Shop Project
- Henley Shop/Technology/Education Class Competencies/Syllabi/Pacing Guides 2025-2026 (in English) (En Español)
- Henley Media Permission/Safe Shop Rules/TinkerCad Permission Form 2025-2026 (in English) (En Español)
Laptop Checks 2025-2026
I. Students must bookmark these sites in a "Barber Folder" on their toolbar. (Here's how):
- Barber Shop Website
- Barber of Cville Blog
- Henley Homepage
- Google Drive
- Schoology
- PowerSchool
- TinkerCad (Please don't log in yet ... we will log in as a class)
- maker:bit / Microsoft Make Code (Please don't log in yet ... we will log in as a class)
- Delicious Biscuits (students must find this in Schoology and break it out of Schoology before bookmarking!)
- Daily Slideshow (students must find the link in Schoology that says "BOOKMARK THIS LINK" and break it out of Schoology before bookmarking!)
| New Way (this year)- notice the shininess of the packing tape! |
- Arduino IDE- We download this from Software Center (quick download)
- Adobe Illustrator- We download Adobe Creative Cloud from Software Center, THEN we download and install Adobe Illustrator from CC. These will both take a LONG TIME! Close as many apps and tabs as you can!

Saturday, June 14, 2025
Weather Station
I finally got a Weather Station. Those who know me or have followed me on Social Media know that I obsess about weather, especially snow prediction. Well, I quit all social media associated with Zuck or Musk and now I'm on BlueSky, Reddit, and NextDoor only. BUT, you can now follow me because of my birthday present this year!
My folks got me an Ambient Weather Station WS-2902:
I waited until after school got out to try to install it and mount it and that ended up being a GOOD call. The software set up was pretty quick and easy ... it reminded me of installing my smart thermostat at my previous house. You use its wifi to start off and connect it to your phone. Assembling it was even pretty easy. Mounting it was a little more difficult. You have to have it completely level (there's a bubble on top for you to use to judge), it has to face North, and you have to both have it a little distance from the house, but close enough for Wifi to reach it. Getting it at least 6' off the ground complicates things a little.
My future Father In Law and I got it done in about an hour. Fortunately, he had a perfect metal pole for the job and he had some pole strapping that we used to attach it to a wooden fence pole.
Now, I'm sharing with AmbientWeather.net ... check it out: Link and my station is KVAAFTON89 on WeatherUnderground.
Wednesday, April 16, 2025
Monday, March 10, 2025
Microcontroller Tutorials (Arduino and micro:bit)
Microcontroller Tutorials
micro:bit
micro:bit is a good basic way to start using microcontrollers. It even has block programming, so elementary students can "code," too! Because my students are in the 7th and 8th grade Mechatronics classes, we use actual code instead of just blocks:
| Lucas | 1 Heart (display) | https://youtu.be/G2U4RgM3RKU |
| Eli | 2 Smiley Button (input) | https://youtu.be/P-oR-a7jmaQ |
| Hudson | 3 Dice (If/Then/Else Loops) | https://youtu.be/cNkABtoAFys |
| Austin | 4 Step Counter (Conditional Loops) | https://youtu.be/kHrf1c6st8g |
| Leigh | "hot potato" | https://youtu.be/9aEHW1uhPWY |
| August | 7 seconds game | https://youtu.be/CMzfFrVYmmI |
| Charlotte | coin flipper | https://youtu.be/A2QU1dh20AU |
| Greg | compass | https://youtu.be/3dgzMmC2GNA |
| Alex | Crashy Bird | https://youtu.be/dxx6bnbqQLc |
| Mason | Fireflies | https://youtu.be/rGUIr7iLg-0 |
| Alden | level | https://youtu.be/Btf57-qJWUU |
| Kingston | love meter | https://youtu.be/aBXZ2B8-ow4 |
| Gerrit | micro-chat (channel) - partner | https://youtu.be/kwgPFr5LP9g |
| Sean | micro-chat (channel)- partner | https://youtu.be/MUUfvhPlAX8 |
| Aaron | Multiple Dice | https://youtu.be/7lGWflE79zg |
| Julian | snap the dot | https://youtu.be/3tN2JF6mo_A |
| Ryan | tug of LED | https://youtu.be/FIk8xNncE1U |
Arduino on TinkerCad
When we use Arduino in the Barber Shop, we try it out on TinkerCad first. This gives a rough draft "try" without having to worry about avrdude/Serial Port errors, AND it gives the coder a good diagram to look at when they are coding IRL:
| Rick | Arduino Button on TinkerCad | https://youtu.be/Dx4jnm88shg |
| Robert | Arduino Fade on TinkerCad | https://youtu.be/NzGHEVFtR6o |
| Eli | Arduino For Loop Iteration on TinkerCad | https://youtu.be/vjjr3HWaQLc |
| Treanor | Arduino RGB LED on TinkerCad | https://youtu.be/TFtF7ppA6bw |
| Landon | Arduino Servo Knob on TinkerCad | https://youtu.be/o4Ujij3pdqQ |
| Alex | Arduino Servo Sweep on TinkerCad | https://youtu.be/-P-BQGk6WjI |
| Tom | Arduino Tone Melody on TinkerCad | https://youtu.be/u3LD3fdMup0 |
Arduino IRL
| Corbin | Arduino Blink In Real Life | https://youtu.be/u4NmsMVaYn4 |
| Alessio | Arduino Blink In Real Life | https://youtu.be/RgPMFSKuy-E |
| Ge0rge | Arduino Button In Real Life | https://youtu.be/-p-HxpWy5Vk |
| Sirius | Arduino Button In Real Life | https://youtu.be/dKgx1ZFbWE8 |
| Braxton | Arduino Fade In Real Life | https://youtu.be/9aEHW1uhPWY |
| Isaiah | Arduino For Loop Iteration In Real Life | https://youtu.be/_azq_C2ZFf8 |
| Sam | Arduino RGB LED In Real Life | https://youtu.be/erlnfEwPcCA |
| Ben | Arduino RGB LED In Real Life | https://youtu.be/Y1ZgwSjP6NU |
| Andrew | Arduino Tone Melody In Real Life | https://youtu.be/PZOtDDSs8oE |
Mechatronics
| Noah | Arduino Servo Knob In Real Life | https://youtu.be/Fk6brQz79YI |
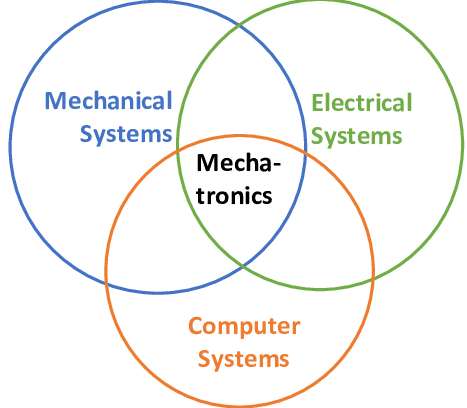
Mechatronics is Programming a Computer to convert Electricity to Mechanical Energy
What are examples?
In the past,
My class has built and flown airplanes, similar to UVA’s RazorDrone
We have built a Lego MindStorm obstacle course (from ANCIENT Lego MindStorms I found left in one of my rooms)
At UVA, Mechatronics built the HooPrint AND a complete working electric guitar
What other examples can you see in a classroom or think of that are Mechatronics?
Tuesday, February 4, 2025
Lasercutting Design Project Spring 2025
~~~~~~~~~~~~~~~~~~~~~~~~~~~~~~~~~~
Laser-cutting a Cell Phone Stand (on Birch or acrylic)
- Cell Phone Stand Video 1- Base File Setup
- Call it "Username Cell Stand Back"
- 12x12” workspace size
- Change to RGB
- Cell Phone Stand Video 2- Setting Up your Back Piece
- Open "Username Cell Stand Back"
- Increase the size of the bottom hole to put in the cords
- 7” tall, 4” wide
- Cell Phone Stand Video 3- Bottom Piece
- Call it "Username Cell Stand Base"
- You will need to add an Engraved Decoration, could be copied and pasted from your earlier work ...
~~~~~~~~~~~~~~~~~~~~~~~~~~~~~~~~~~
Challenge Coin (on Birch)
~~~~~~~~~~~~~~~~~~~~~~~~~~~~~~~~~~
Earrings (on Basswood)
- We trace the teacher's choice image/logo using their link or a Google image search and words like logo, cartoon, clipart, comic, outline, or silhouette to make the hornet as easy to trace as possible. Remember that you WON'T be coloring it! (Stroke: RGB Blue, Fill: None)
- The outline of the shape and the small hole vary, but we can iterate after you've lasercut on cardboard. (Stroke: RGB Red, Fill: None)
- After you've made the first one, we will be reflecting some or all of the design so that it's a mirror image of the first one. Then we will move them as close together as possible.
~~~~~~~~~~~~~~~~~~~~~~~~~~~~~~~~~~
Hall Pass (on Birch)
- We trace a (non-Georgia Tech Yellow Jacket) Hornet using Google image search and words like logo, cartoon, clipart, comic, outline, silhouette to make the hornet as easy to trace as possible. Remember that you WON'T be coloring it! (Stroke: RGB Blue, Fill: None)
- You will also be tracing the teacher's choice image/logo the same way! (Stroke: RGB Blue, Fill: None)
- The Teacher's Name, Room Number, and Henley Hall Pass (Stroke: RGB Blue, Fill: None) using the text tool to make them as readable as possible, using Calibri, Courier, Verdana, Arial, or other Sans Serif Fonts. All the words should be sized the same without stretching them!
- The Rounded Rectangle should be 3.5" x 3.5" and the hole should be big enough circle to clip a lanyard holder through the top but not TOO close to the top so it won't break off (we don't supply lanyards ... I don't have any to give away) (Stroke: RGB Red, Fill: None)
~~~~~~~~~~~~~~~~~~~~~~~~~~~~~~~~~~
- We trace a (non-Georgia Tech Yellow Jacket) Hornet using Google image search and words like logo, cartoon, clipart, comic, outline, silhouette to make the hornet as easy to trace as possible. Remember that you WON'T be coloring it! (Stroke: RGB Blue, Fill: None)
- It SHOULD have a Rectangle that he can specify the size. (Stroke: RGB Red, Fill: None) We can probably adjust the size after you have cut your first prototype on cardboard.
~~~~~~~~~~~~~~~~~~~~~~~~~~~~~~~~~~
- We trace the teacher's choice image/logo using their link or a Google image search and words like logo, cartoon, clipart, comic, outline, or silhouette to make the hornet as easy to trace as possible. Remember that you WON'T be coloring it! (Stroke: RGB Blue, Fill: None)
- The outline of the shape and the small hole vary, but we can iterate after you've lasercut on cardboard. (Stroke: RGB Red, Fill: None)
- We can probably adjust the size after you have cut your first prototype on cardboard.
~~~~~~~~~~~~~~~~~~~~~~~~~~~~~~~~~~
Lasercutting 3D Snowflakes or Ornaments (on Basswood)
- We trace the teacher's choice image/logo using their link or a Google image search and words like logo, cartoon, clipart, comic, outline, or silhouette to make the hornet as easy to trace as possible. Remember that you WON'T be coloring it! (Stroke: RGB Blue, Fill: None)
- The outline of the shape and the small hole vary, but we can iterate after you've lasercut on cardboard. (Stroke: RGB Red, Fill: None)


