Wednesday, March 13, 2024

TinkerCad NameTag Lesson

Making a Name Keychain in Tinkercad
By Jessy Ratfink March 24, 2020

This is an old tutorial (so some of the tools/buttons look different than now). There are multiple pics, videos, and little descriptions that will show you how to make a VERY small nametag. 

This tutorial teaches you and proves you understand how to do SEVERAL skills on a CAD program to make a 3D-printable object: Sizing and moving objects, Overlapping them, aligning and intersecting a cylinder with another, make the middle one a hole, and grouping them to make a hole through an object.


Some hints from Mr. Barber:

  • To find the individual letters you need, click on the menu that says basic shapes to get the pull-down menu. Select Design Starters. All the letters are in there, but they are in a weird order.


  • Use THICK, BOLD, CHONKY letters. Make your ring and your letters BIGGER than the tutorial says to. (Otherwise the tutorial has you make a VERY small, delicate, fragile name tag.) If you resize, make sure to use  the <SHIFT> button!

  • Once you have gotten a thumbs-up from Mr. B, you can export as an STL to my BARBERTECHNOLOGYFOLDER in the (S:/) Student Share Drive. Make sure you have named it your username and NAMETAG (ex: jwb2f NAMETAG) first!!!


When it successfully prints, it will be waiting for you in a nearby orange tray (it MIGHT fail, even if you did everything right ... someone else's could be wrong and "spaghetti", "glob up", or the 3d printer could just mess up). If you pick it up, get a keyring from the purple tray, put it on and get a pic on Mr. B's phone to get your grade before you take it out of the room!


Thursday, February 8, 2024

Lasercutting Projects in the Barber Shop 💈

Video on the Basics of an Adobe Scribble

​​Finding a Logo online for tracing


Lasercutting a 3D Snowflake

  • You can find a snowflake online to trace ... and you only trace one. THEN, you copy and paste it before adding the box and the hole
  • The box has to be the width of a piece of birch (.125"?) and it needs to be half as tall as your snowflake.

Laser-cutting a Cell Phone Stand

  1. Cell Phone Stand Video 1- Base File Setup
    • Call it "Username Cell Stand Back"
    • 12x12” workspace size
    • Change to RGB
  2. Cell Phone Stand Video 2- Setting Up your Back Piece
    • Open "Username Cell Stand Back
    • Increase the size of the bottom hole to put in the cords
    • 7” tall, 4” wide
  3. Cell Phone Stand Video 3- Bottom Piece
    • Call it "Username Cell Stand Base
  4. You will need to add an Engraved Decoration after. Decorations can be traced from the Internet or they could be copied and pasted from any of your earlier work ... and if it's YOUR work, it's not cheating!


Coaster or Sign


Every Hall Sign should have:
  • a 12” x 12” RGB Red rounded rectangle (coasters are smaller, maybe 4" x 4")
  • RGB Logo or Design to be traced
  • RGB Blue Arrows and Words in a legible font
  • Talk to your client to figure out how to make yours special
Just food for thought:
  • What are your plans for colors after it’s lasercut and engraved? (I don't think you WANT to color a coaster unless your client requests it)

HallPass

    • a 3” x 3” RGB Red rounded rectangle and a circular hole at the top
    • RGB Blue Hornet
    • RGB Blue teacher name and room number and the words “Hall Pass”
    • Talk to the teacher to figure out what other decorations to add in RGB Blue.

    earrings

    • This is usually a cool shape in RGB Red with an RGB Blue engraving in the middle (copy and paste, maybe reverse the image?)
    • You will need a small RGB ellipse at the top to connect to the metal in my desk drawer.


    garden stakes

    • This has a design at the top.
    • The RGB red outline will have to end in a point (for inserting into the ground).


    lanyard charm

    • This is usually a cool shape in RGB Red with an RGB Blue engraving in the middle.
    • You will need a small RGB ellipse at the top AND at the bottom for holes to connect to the lanyard.


    shadow box (4 interconnecting walls with the same design)


    Here are the walls that I designed on my laptop up front (ask to see the box and I can show you!):


      Wednesday, October 25, 2023

      Barber Shop Microcontroller Intros


      Barber Shop Microcontroller Intros (using micro:bits and Arduino Unos)
      Mechatronics (Technological Systems 8457 and 8463) Exploring Technological Systems competencies #31-42

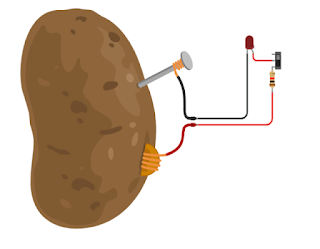
      I. Potato Circuit (with Universal Systems explanation)

      1. Make a circuit that can light an LED on and off (you will need to add an on/off switch), using a potato or several potatoes for power: https://youtu.be/-fvmb4lchnA
      2. Add more potatoes until it overloads the lightbulb (hover over the lightbulb)
      3. Experiment with it. Other fruits? Can it make other items “run?” What can you do that’s different than everyone else?
      4. You will have to explain how it applies to the Universal Systems model at the end.

      The Universal Systems Model

      The Universal Systems model is a way to understand how things work together to achieve a goal. It has four main parts: inputs, processes, outputs, and feedback. Inputs are the things that go into a system, like people, materials, time, energy, and information. Processes are what happens to the inputs to make them into something new or useful. Outputs are the results of the processes, like a finished product or a service. Feedback is information that tells us how well the system is working and helps us make improvements.

      In the Universal Systems model, inputs can be things like resources, knowledge, and tools. For example, when a company makes candy bars, the inputs are the cocoa beans, sugar, and machinery they use to make the bars. Processes are the actions that happen to the inputs to turn them into something new. In the candy bar example, the processes would be mixing the ingredients, shaping the bars, and packaging them. The outputs are the finished candy bars that are then shipped to stores. And feedback could be customer reviews or sales data that tell the company how well its candy bars are doing.

      Feedback is important because it helps us make improvements to the system. If we get feedback that something isn't working well, we can make changes to the inputs or processes to get a better output. For example, if people complain that the candy bars are too sweet, the company could adjust the amount of sugar they use in the recipe. Feedback can come from many sources, like customer reviews, surveys, or trends in the market.

      So, the Universal Systems model helps us understand how things work together to achieve a goal. It shows us that inputs go through processes to become outputs, and feedback helps us make improvements. It's like a big puzzle where all the pieces fit together to make something great!

      Input

      There are 7 types of resources that provide input: There are 7 types of resources that provide input:
      1. People
      2. Materials - natural, synthetic, raw, industrial
      3. Tools and machines - measuring, layout, separating, forming, and combining
      4. Energy - inexhaustible, renewable and nonrenewable (examples - heat, light, sound, chemical, nuclear, mechanical, and electrical)
      5. Time
      6. Capital - money, land, structures, and equipment
      7. Information

      Processes

      It's what happens to the inputs
      • All the activities that need to take place for the system to give the desired result
      • A series of actions directed to an end
      • The inputs are combined by means of management and production.
        • Managing - planning, organizing, and controlling
        • Production - the actual making of the product

      Outputs

      The resulting product of inputs and processes
      • Everything that results:
        • Intended outputs
        • Nonintended - ex. waste (pollution) or changes in society (communicating through e-mails
      • Outputs can be:
        • Desirable
        • Undesirable
        • Expected
        • Unexpected
      • Example: The output of our cleanup system:
        • Clean, safe, organized room
        • Clouds of dust
        • Lost teaching time
        • Wear and tear on the equipment

      Feedback

      The reaction to the inputs, process, and outputs. They serve to reinforce or alter the elements of the system.
      • Cleanup example - Feedback - the next class coming into the room, If they complain or trip over equipment left out, the system would have to be improved.
      • Feedback becomes an input into the system

      Check out these 3 Potato Circuits

      Watch this video 

      Now, you need to apply this system to our Potato Circuit lesson. Explain each of the 4 parts and what they are in your potato. In the end, what is your feedback, and why did I have you watch the second video?

      37. Explore the Universal Systems Model.
      Exploration should include:
      • inputs (e.g., people, materials, time, capital, energy, information)
      • processes (e.g., management, production)
      • outputs (e.g., intended, unintended)
      • feedback (e.g., open-loop, closed-loop).
      Process/Skill Questions:
      • What is the difference between open- and closed-loop systems?
      • How does feedback change the process?
      • What is an example of a production process?
      38. Analyze a product, process, or system, using the Universal Systems Model.
      Analysis should include:
      • inputs
      • processes
      • outputs
      • feedback 
      Process/Skill Questions:
      • What are the intended and unintended outputs?
      • How does one know if the system is open- or closed-loop?
      • How does the product, process, or system convert inputs into outputs?

      Monday, August 21, 2023

      Barber Shop blasting off Info

      Important Links

      Barber Pole Gif GIFs | Tenor

      Contact Info

      Students, parents, and guardians, you can always call Henley and leave a voicemail by dialing 434-974-4700, selecting 1, and entering my extension number (51164), but here are some other ways to connect with me:

      I'm looking forward to a great year with you!
      -Mr. B

      Tuesday, August 30, 2022

      Laptop Checks

       I. Students must bookmark these sites in a "Barber Folder" on their toolbar. (Here's how):

      1. Barber Shop Website (YOU NEED THE ONE FROM THIS YEAR, NOT LAST YEAR)
      2. Barber of Cville Blog 
      3. Henley Homepage 
      4. Google Drive 
      5. Schoology
      6. PowerSchool 
      7. TinkerCad (Please don't log-in yet ... we will log in as a class)
      8. maker:bit / Microsoft Make Code (Please don't log-in yet ... we will log in as a class)
      9. Delicious BBQ (students must find this in Schoology and break it out of Schoology before bookmarking!)
      10. Daily Slideshow (students must find the link in Schoology that says "BOOKMARK THIS LINK" and break it out of Schoology before bookmarking!)
      II. Your charger has 2 pieces, and, therefore, needs 2 labels, one on each part. You need a flag on your removable cord affixed with clear packing tape (your first and last name!) and you need to tape over your label with clear packing tape:
      New Way (this year)- notice the shininess of the packing tape!
      Old Way (last year)

      III. You also need to pin shortcuts on your taskbar to the 2 apps we download:
      • Arduino IDE- We download this from Software Center (quick download)
      • Adobe Illustrator- We download Adobe Creative Cloud from Software Center, THEN we download and install Adobe Illustrator from CC. These will both take a LONG TIME! Close as many apps and tabs as you can!
      Arduino
      Adobe Creative Cloud
      Adobe Illustrator


      IV. Come show Mr. Barber when you're pretty sure you're going to get a good grade (not when you've done only a little of the Laptop Check ... I don't want to enter in a 4/14 F!!)

      Get Good Grades GIFs - Get the best GIF on GIPHY

      Friday, December 17, 2021

      Mouse Holster Design Challenge

      Mouse Holster Design Challenge

      The Goal? To create a storage solution for computer mice that will protect the mouse, the mouse cord, keep them out of the way, and that is durable and easy to use.

      Learn from the past:

      1. 

      Notice how easy it is to hang the cord through the bottom of the brown holster. Compare it to others where people stuff the mouse cord in (tangled and unattractive)!

      ===================

      2. 

      The Good? This is thick and durable! The Bad? It's been made too small, too tight, making it difficult to fit the mouse in, much less the cord hanging out of the bottom.
      ===================

      3. 

      This one hangs low. It's a lucky thing that it has lasted and not broken. The bottom shows an innovative way to hang the cord, but the user must thread it through every time. Usually, students just stuff it in there, because they are in a hurry to leave.
      ===================

      4. 

      Notice how thin the sections are. It's cracked and broken in several places. There also seems to be wasted plastic at the top.
      ===================

      5. 

      Compare these two. Both are hard to use at the bottom, but one wasted MUCH more filament, while one focused on saving material.
      ===================

      6. 

      This is probably my favorite design up there. Easy to use, durable, smooth, curved edges.
      ===================

      Guidelines for Success:

      • Measure computer mice (with calipers) to figure out how to make your holster SLIGHTLY larger.
      • Figure out how you measure and create your walls, etc. the correct size to start with. 
      • Learn how to chamfer and fillet edges, to save filament. What other strategies can you use to save filament?
      • Plan your pilot holes, like you did for your plaque. We will use screws but you need the correct-size pilot hole.
      • Notice the holster you like using the most. Emulate it, but improve on it! What do you like about it? Think about my comments above!
      • Think about how you have to place your holster on the build plate so that it will print correctly!
      • We won't print massive or teeny holsters that obviously won't work. 
      • I plan to print only the best designs, though all designs can get a grade if you show me when I can type in a grade and talk to you about it.

      Tuesday, December 7, 2021

      Lasercutting a 3D Snowflake

      Lasercutting a 3D Snowflake


      or for a REAL CHALLENGE (this will take longer and be more work!):

      Laser-cutting a Cell Phone Stand

      1. Cell Phone Stand Video 1- Base File Setup
        • Call it "Username Cell Stand Back"
        • 12x12” workspace size
        • Change to RGB
      2. Cell Phone Stand Video 2- Setting Up your Back Piece
        • Open "Username Cell Stand Back
        • Increase the size of the bottom hole to put in the cords
        • 7” tall, 4” wide
      3. Cell Phone Stand Video 3- Bottom Piece
        • Call it "Username Cell Stand Base
      4. You will need to add an Engraved Decoration, could be copied and pasted from your earlier work ...


      Monday, October 11, 2021

      Henley Picnic Table Service Project

      This post is under construction (see what I did there?)

      Usually, my engineering classes build doghouses for needy dogs through Houses of Wood and Straw. It's a wonderful service program, provides a LOT of valuable learning in the woodshop, and H.O.W.S. reaches out to local businesses, like Blue Ridge Building, to donate the wood. I typically have Guidance schedule as many Engineering classes in the fall so that they can participate in this and save as many dogs as possible from a freezing winter. This year, H.O.W.S. is holding off with builds, etc. because of the high price of lumber. I have had to pivot to a new project that doesn't have someone donating wood. I immediately focused on helping the school with hall passes and directional signs while I noticed the lack of outdoor seating for all of our outdoor lunches (which are out there, of course, due to Covid). The only drawback is the high cost of lumber and hardware.

      I'm currently pricing everything it will take to build 15 doghouses (5 per class) for Henley at both Home Depot and Blue Ridge Building Supply (now called Cardinal Home Center), but I fully expect it to be quite costly.  


      My assistant principal Becky Fisher and principal Beth Costa have encouraged me to go ahead with the process. I really do feel like this is both a useful and a worthy service project for my kids in my engineering classes, in addition to providing Henley students with a valuable resource, as we spend so much time outdoors during Covid.


      I have found Home Depot's plans: https://www.homedepot.com/c/ah/how-to-build-a-picnic-table/9ba683603be9fa5395fab902da03929  to be HORRIBLE. My class and I are interpreting them and making new plans as we go. The pictures don't match the materials or the directions, so we are even taking pictures. Here is our slideshow, complete with plans and guidelines for excellence: